Support After Introduction
We provide handling precautions and troubleshooting for MEDISAFE WITH users.
- How to select an application site
- How to attach the pump
- How to remove air bubbles
- Precautions for bathing
How to select an application site
To select an application site for the Infusion Set and to prevent it from peeling off, pay attention to the following items 1 to 3
How to select an application site for the Infusion Set and measures against peeling off
-
We recommend that you start from the front part of your body where you can check the attachment condition yourself and operate the device properly with both hands until you get used to puncturing the Infusion Set and attaching/detaching the pump.
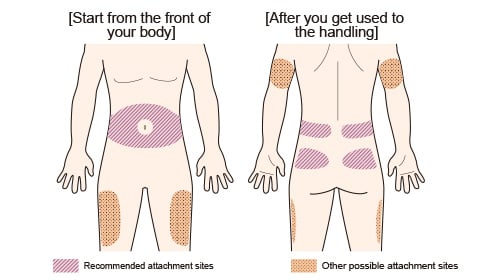
The following sites should be avoided
Be sure to rotate the application position to avoid skin problems.
Within 5 cm around your navel
Sites with wounds or calluses
Above the ilium (pelvic bone)
Locations overlaid by trouser belts or locations where the patch is more likely to peel due to rubbing against clothing
Locations where the skin surface is likely to bend or stretch often during the day, etc.
-
Wipe the puncture site and the entire application site with an alcohol swab before application.
Wipe away dirt or sebum of the skin carefully, let it dry completely, and apply Easy Patch to your body while stretching your skin.
After application, securely attach the device by tracing not only around the adhesive tape but also the entire holder with your finger to eliminate any “wrinkling” or “detachment” of the adhesive tape.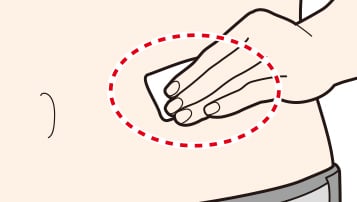
If dirt or sebum remains on the skin, the adhesive strength of the patch will weaken and the patch may peel off easily.
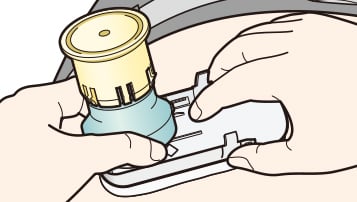
Stretch your skin and attach it securely to avoid any detachment or peel-off of the adhesive tape.
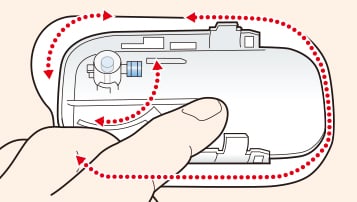
Press the holder and outer area of the adhesive tape by tracing with your finger, and confirm that the edges of the seal are not detached or peeled off for secure attachment.
How to remove the release paper from the adhesive tape
Holding the tab of the release paper, peel it off as if slowly turning it from the inner side to the outer side.
When removing the release paper, do not touch the adhesive surface of the adhesive tape.
If you touch the adhesive surface of the adhesive tape, the tape may be folded or wrinkled and not attach properly. If the adhesive tape cannot be properly attached, replace it.
It easily comes off if you turn it toward the outer side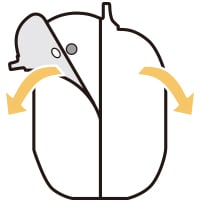
-
If you are concerned about the tape peeling off and detaching during use, please also consider applying surgical tape around the adhesive tape to reinforce the area.
Do not apply surgical tape from the top of the holder.
Paste the reinforcement tape so that it passes through the gap between the holder and the adhesive tape.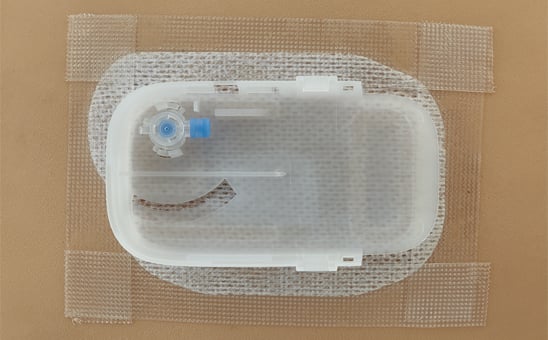
Reinforcemnet example using surgical tape
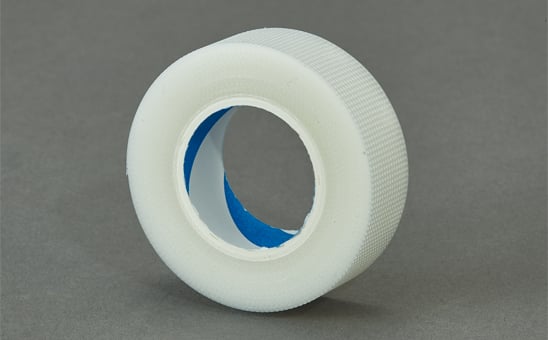
surgical tape
How to attach the pump
Failure to securely connect the pump to the holder of the Infusion Set may result in poor insulin delivery.
To securely attach the pump, pay attention to the following points
-
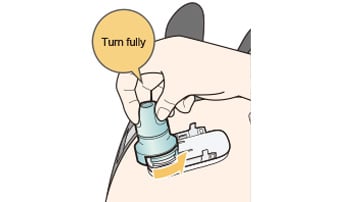
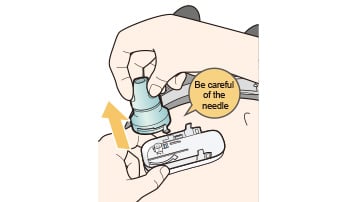
With the MEDISAFE WITH Infusion Set, turn the puncturing knob until it can no longer turn, and lift it straight up.
Key points
Turn the puncturing knob until it can no longer turn and lift it straight up
Check if the rubber port has been attached.
-
1
Turn the puncturing knob counterclockwise to puncture.
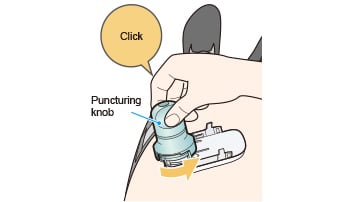
-
2
Turn the knob until it can no longer turn.
-
3
Lift the puncturing knob straight up.
-
※
Do not pull or pull out at an angle until the puncturing knob is fully turned. The rubber port may not be connected to the Infusion Set in rare cases.

Example of a failureThe rubber port remaining in the puncturing tool without being connected
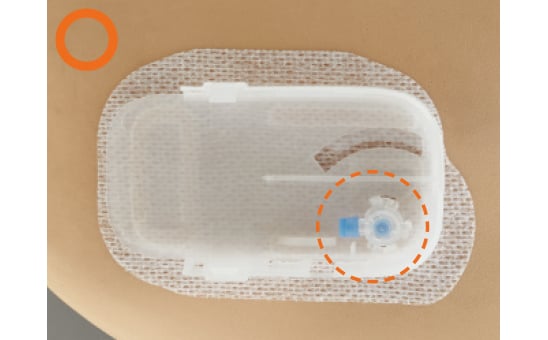
Successful exampleThe rubber port is attached to the holder
-
Failure to securely connect the pump to the holder of the Infusion Set may result in poor insulin delivery.
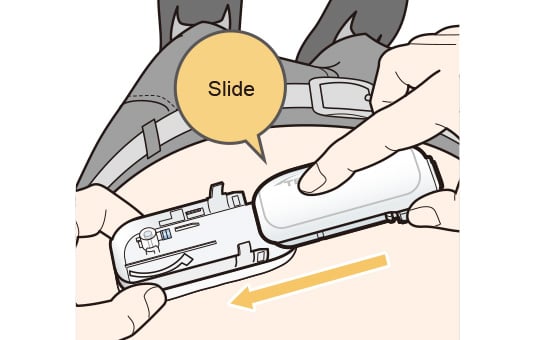
When connecting it, follow steps 1 to 3 below for secure attachment-
1
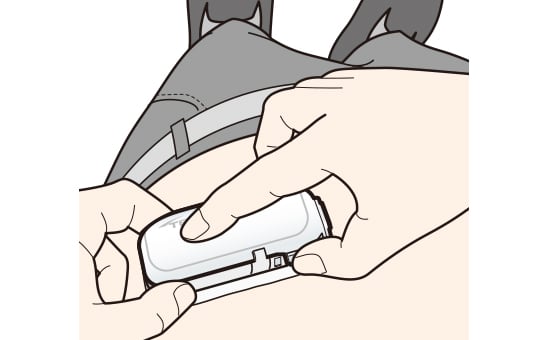
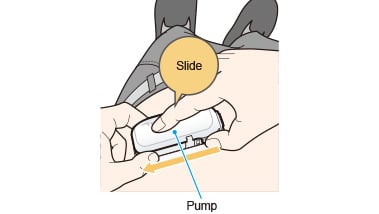
Slide the pump slowly into the holder with your finger pushing lightly on the top so that there is no gap between the pump and the holder.
-
2
After attaching the pump to the holder, check that the attachment is secure in the following steps 1 to 3
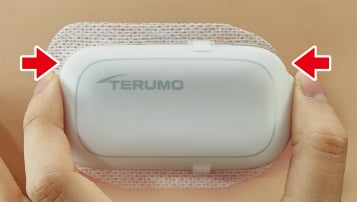
STEP1Press firmly on both sides of the pump and holder
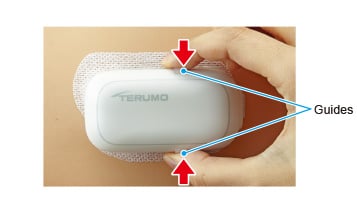
STEP2Press down on the base of the holder guides to fix it securely. You will hear a click if the tab of the cartridge is not engaged in the holder
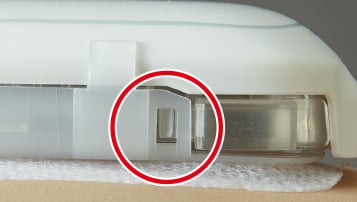
STEP3Make sure the left and right tabs of the cartridge fit properly in the holder
-
3
To confirm secure attachment of the pump, check (How to confirm secure attachment of the pump) points 1 to 3 below
Check if there are any gaps between the pump and the holder by tracing the non-visible side with your fingers.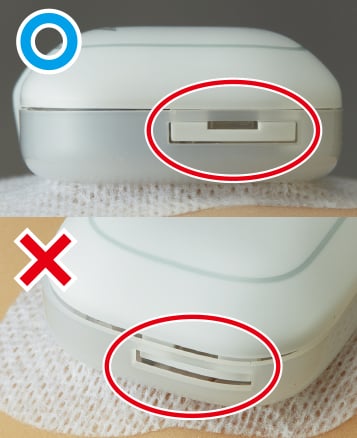
Make sure the end of the pump fits properly in the holder.
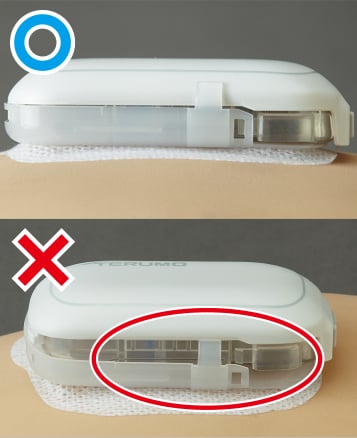
The pump must be held by the guides on the holder and there must not be any gaps between the pump and holder.
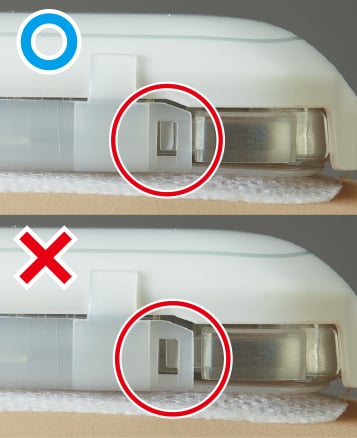
Make sure the left and right tabs of the cartridge fit properly in the holder.
Points to note when attaching/detaching the pump (before bathing)
When the pump is removed from the holder, for example when taking a bath, be careful not to let your towel or clothes, etc., get caught in the guides of the holder.
Also, be sure to attach a protective cover to the holder.Your towel or clothes, etc., may get caught in the guides and the adhesive tape may peel off.
They may also get caught in the rubber port of the Infusion Set with towels or clothes, damaging it as a result.
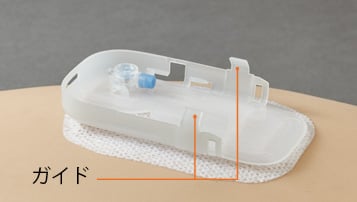
Be careful not to let your towel, etc., get caught in the guides.
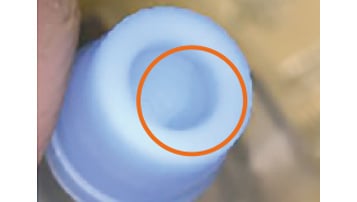
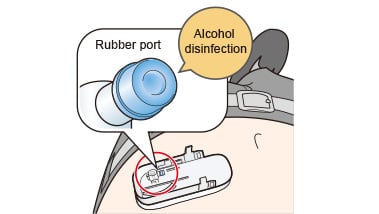
As water droplets tend to remain in the dented parts of the rubber port after you take a bath, be sure to wipe the rubber port with an alcohol swab.
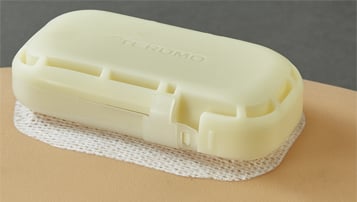
When removing the pump, be sure to attach the protective cover.
-
How to remove air bubbles
If air bubbles remain inside the cartridge, this may prevent insulin from being injected and result in hyperglycemia.
-
If air bubbles larger than 1 mm are observed in the reservoir after filling insulin, make sure to remove them (deaerate) according to the steps 1 to 7 below, then prime the reservoir using remote control.
-
※
If air bubbles remain, insulin delivery may be disrupted, causing a risk of hyperglycemia.
-
1
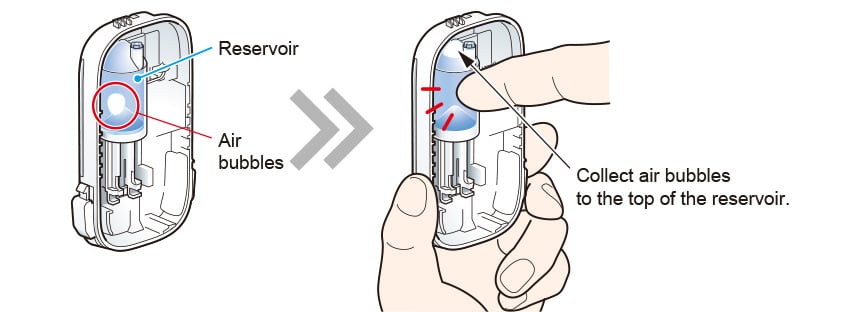
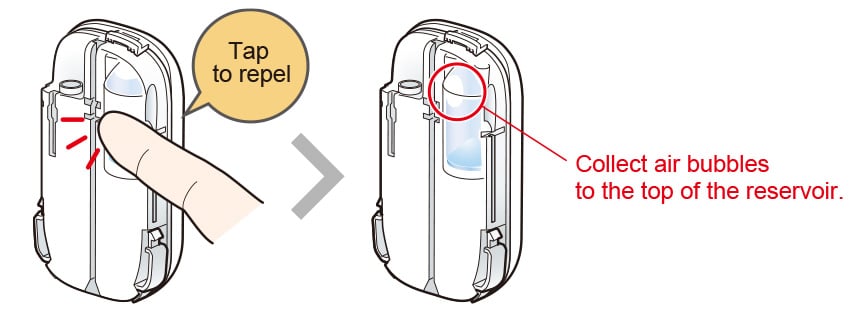
Tap the reservoir of the cartridge lightly with your fingertip to collect air bubbles to the top of the reservoir.
-
2
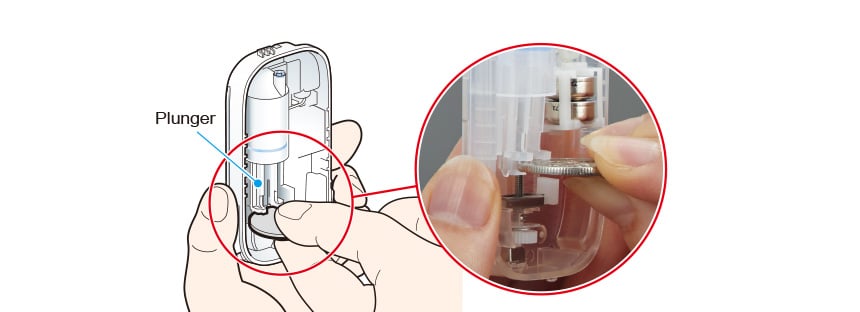
Insert a coin or the like into the groove at the bottom of the plunger.
-
3
Push up the plunger to expel any air bubbles until insulin comes out of the “delivery port needle” located at the back of the cartridge.
Push the plunger straight up, slowly, and parallel to the reservoir.
Be careful not to touch the screw and gears as they are precision parts.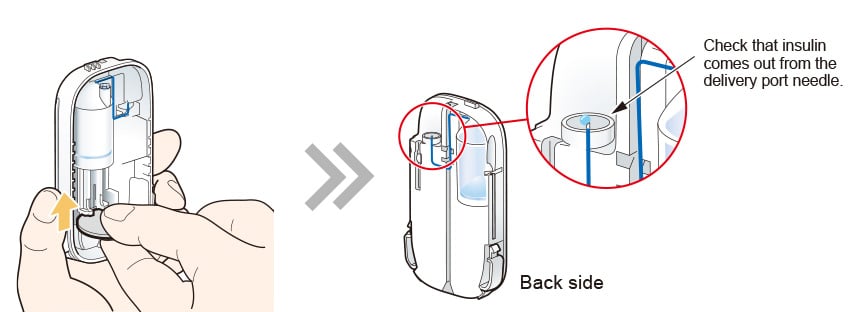
-
4
Attach the cartridge to the main pump unit.
-
5
Set communication between the pump and remote control.
-
6
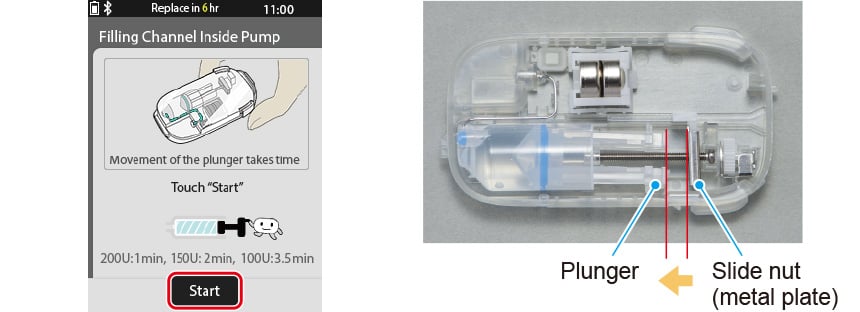
Touch “Start” on the “Filling channel inside pump” screen of the remote control to start priming.
-
※
Priming is also done for the purpose of attaching the slide nut and the plunger. Even after expelling air bubbles (deaeration) after filling the cartridge, be sure to prime the pump (fill the channel inside the pump) again and confirm that insulin comes out continuously from the delivery port needle.
If the slide nut and the plunger are not attached, insulin delivery may not be started, causing a risk of hyperglycemia.
-
-
7
Touch “Stop” once you see a few insulin droplets at the tip of the delivery port needle.
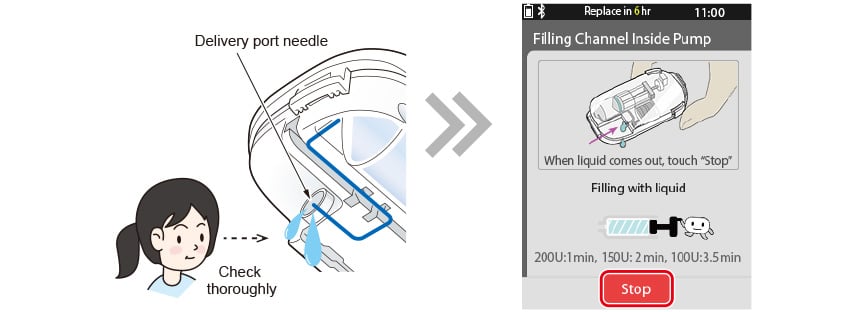
Key points
Be sure to prime the pump and check that insulin comes out continuously from the delivery port needle.
If insulin drops accumulate around the delivery port needle in the cartridge, clean them with an alcohol swab before attaching the pump to the holder.Approx. priming time
For 200 U ... approx. 1 min.
For 150 U ... approx. 2 min.
For 100 U ... approx. 3.5 min.
-
-
If large air bubbles are observed inside the reservoir of the cartridge during use of MEDISAFE WITH, be sure to remove them (deaerate) using the flush function.
-
※
If large air bubbles remain in the reservoir, insulin delivery may be disrupted, causing a risk of hyperglycemia.
-
1
Touch [Suspend] on the remote control, before removing the pump from the holder and check the reservoir from the cartridge side.
-
※
Be sure to flush with the pump removed from the holder.
Flushing cannot be performed with the pump connected to the holder.
-
-
2
If large air bubbles are observed, hold the pump vertically as shown in the right figure, and collect the bubbles to the top of the reservoir by tapping the reservoir with your fingers from the back of the cartridge.
-
3
Hold the pump vertically. With the air bubbles collected at the tip of the reservoir, touch [Flush] on the suspend screen on the remote control and then [Flush] to push out the air in the reservoir and the pump channel. Every time you touch [Flush], 1 U of insulin will be delivered.
Touch [Suspend], [Flush], [Flush], [Re-Flush] to flush again, and [Finish] to end.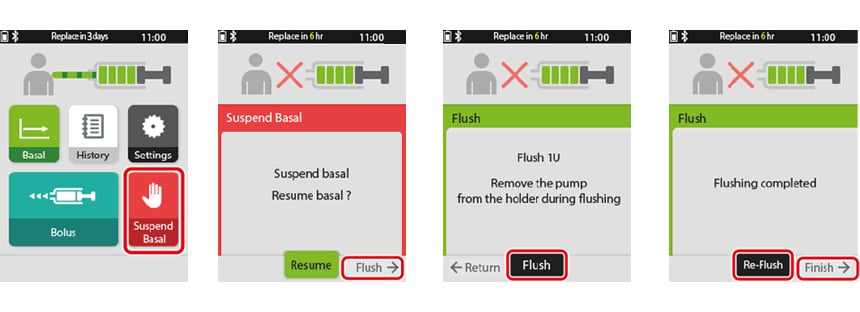
-
4
Touch [Re-Flush] and repeat flush until you confirm continuous delivery from the delivery port needle.
If insulin drops accumulate around the delivery port needle in the cartridge, clean them with an alcohol swab.
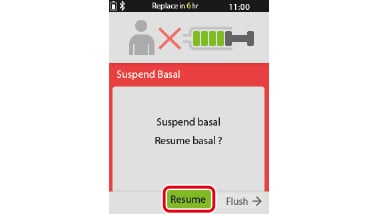
After completion of deaeration, insert the pump and touch [Finish] and [Resume].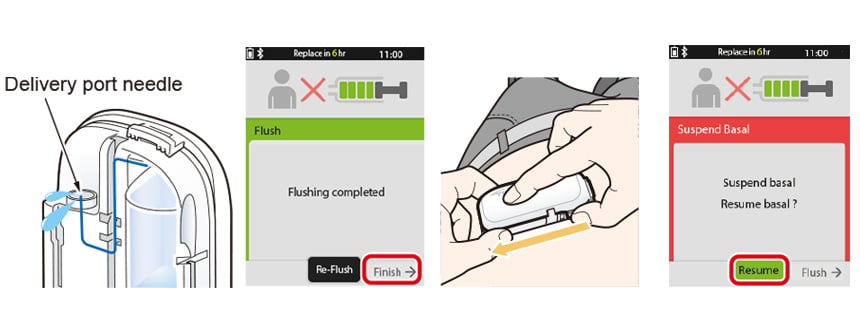
-
※
Remember to attach the pump and resume the basal rate. After the basal rate stops, an alert notification is given every 15 minutes.
-
Key points
Do not detach the main pump unit and the cartridge unnecessarily.
If the main pump unit is attached again after removing from the cartridge during use, the “remaining liquid in reservoir indicator” and “replacement timing indicator” will be reset and not be displayed correctly.
-
Precautions for bathing
Be sure to remove the pump when you are taking a bath.
As the main pump unit and the remote control are water-resistant, light rainfall or sweat is not a problem, but do not use a pump if wet or immersed in water.
-
When the pump is removed from the holder, for example when taking a bath, be careful not to let your towel or clothes, etc., get caught in the guides.
Also, be sure to attach a protective cover to the holder.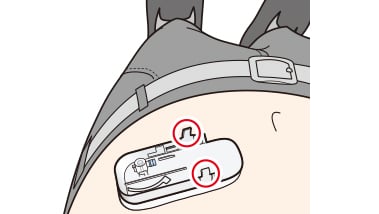
Be careful not to let your towel, etc., get caught in the guides
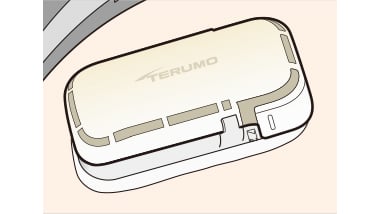
When removing the pump, be sure to attach the protective cover
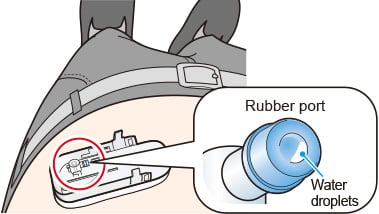
As water droplets tend to remain in the dented parts of the rubber port after you take a bath, be sure to wipe the rubber port with an alcohol swab
-
※
Your towel or clothes, etc., may get caught in the guides and the adhesive tape may peel off. They may also get caught in the rubber port of the Infusion Set, damaging it as a result.
-
-
-
1
Suspend basal rate
-
※
If the pump is removed without suspending the basal rate, a “pump removed” alert will be given.
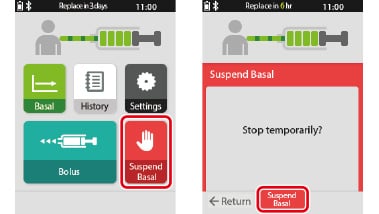
-
-
2
Remove the pump from the holder of Easy Patch while pressing the remove buttons on both sides of the pump
-
※
Do not detach the main pump unit and the cartridge unnecessarily after removal of the pump.
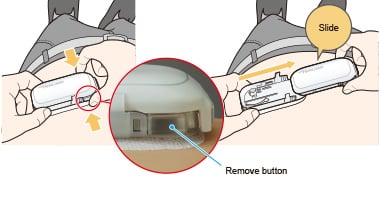
-
-
3
Slide the protective cover onto the holder to attach it.
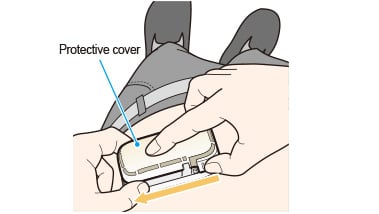
-
-
-
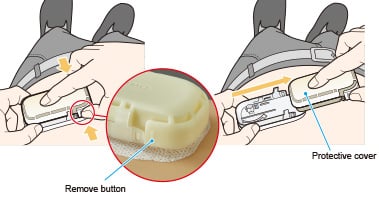
1
Remove from the holder while pressing the remove buttons on the protective cover.
-
2
Disinfect the rubber port area.
-
3
Insert the pump into the holder.
-
4
Touch [Resume].
-
※
Remember to attach the pump and resume the basal rate. After the basal rate stops, an alert notification is given every 15 minutes.
-
※
The protective cover is not waterproof. After getting out of a bath or a swimming pool, wipe the area near the rubber port with an alcohol swab.
-